Simulations#
Once the input files have been uploaded to the STORAGE, you can start the simulation from the SIMULATIONS menu.
From the Simulations menu you can:
-
run an analysis
-
monitor an analysis
-
stop an analysis
-
restart an analysis
This page also gives some hints on choosing the computing resources for your simulation.
Templates and examples#
Before your first run, have a look at the material we provide in the CloudHPC GitHub repository.
Templates#
The templates are recommended, cloudHPC-ready input files for the most common solvers. Copy them into your case and adapt them to your model to make sure your settings work on the platform (parallel decomposition, restart, runtime monitoring, ...).
| Template | Solver | Content |
|---|---|---|
| OpenFOAM/system | OpenFOAM | controlDict and decomposeParDict with restart, runtime monitors and cloudHPC custom entries |
| OpenFOAM-custom | OpenFOAM v2412 | complete case with a custom solver and boundary condition compiled before the run |
| code-aster | code_aster | export, MPI-ready input.comm and restart database folder |
| FDS | FDS | multi-mesh template.fds with MPI_PROCESS, restart dump and devices |
| custom-script | custom-script | bash run.sh skeleton |
| python-script | custom-script | parallel Python job with requirements.txt, runtime monitor and checkpoint/restart |
Examples#
The examples are complete cases that you can upload and run as they are, e.g. to test a new account. Each one has its own README with the exact settings to use in the web app and the expected results.
| Example | Script | vCPU |
|---|---|---|
| pitzDaily-of13 | openFoam-of13 |
4 |
| damBreak-v2412 | openFoam-v2412 |
4 |
| motorBike-of12 | openFoam-of12 |
8 |
| naca0012-su2830 | SU2_CFD8.3.0 |
4 |
| SU2_8.3_Turbulent_ONERAM6 | SU2_CFD8.3.0 |
16 |
| roomFire-fds691 | fds6.9.1 |
2 |
| fds-6.7.5 | fds6.7.5 |
1–8 |
| beam-ccx221 | calculiX-2.21 |
4 |
| flange-ca136 | codeAster-17.0_mpi |
8 |
| poisson-fenicsx060 | FEniCSx-0.6.0-r1 |
4 |
| silo-liggghts380 | LIGGGHTS-3.8.0 |
4 |
| office-ep2520 | EnergyPlus-25.2.0 |
1 |
| gpuBenchmark-cuda123 | custom-script-cuda12.3 |
4 (basegpu) |
| python3.12 | custom-script-u24 |
1 |
Run a simulation#
To run a simulation, start by adding a new one, as shown in the following picture.

A new page opens. This page is divided into two parts:
-
In the first part, you select the vCPU, RAM and instance type you want to use:
-
Each virtual CPU (vCPU) is a single hardware hyper-thread, except for the highcore and hypercore instances, where each vCPU is a physical core. Not all the available software can benefit from hyper-threading.
-
RAM is the memory made available to the simulation, and it is allocated per vCPU. The highcore and hypercore selections allocate a multi-core instance without hyper-threading, useful to get the most out of software that does not benefit from hyper-threading. The basegpu selection allocates NVIDIA TESLA T4 GPUs in proportion to the vCPU selected. Here is a summary of all the options:
- standard: hyper-threaded instance with 4 GB of RAM per vCPU
- highmem: hyper-threaded instance with 8 GB of RAM per vCPU
- highcpu: hyper-threaded instance with 1 GB of RAM per vCPU
- highcore: multi-core only instance with 2 GB of RAM per vCPU (core)
- hypercpu: hyper-threaded instance with 1 GB of RAM per premium vCPU
- hypercore: multi-core only instance with 2 GB of RAM per premium vCPU (core)
- basegpu: hyper-threaded instance with 8 GB of RAM per vCPU and 1 NVIDIA TESLA T4 every 2 vCPU
-
REG/SPOT are the two types of machines available to run the analysis. They use the same hardware, but REG machines are dedicated to your analysis until it ends, while SPOT machines can be rebooted at any time during the calculation. After a reboot, the simulation restarts from the last saved restart file. See SPOT instance correct setup for how often this happens and how to prepare your case.
-

- In the second part, you select the folder to work on and the software to use:
- Folder: the list of storage folders, from which you pick the one containing your case
- Mesh: the list of storage folders. It is optional and is only used by specific software, as explained below:
- OpenFOAM: the polyMesh and triSurface folders are copied from the Mesh folder into the selected Folder, where the solver runs.
- Script: the list of solvers you can run on the selected Folder
The parameters can be classified in two ways: mandatory or optional, and basic or advanced. Some advanced parameters may not appear in your account, because they must be enabled by an administrator: in that case, cloudHPC automatically uses their default values. To have the advanced parameters enabled, email us at info@cfdfeaservice.it.
| Parameter | Mandatory | Advanced | Default |
|---|---|---|---|
| vCPU | ✅ | - | |
| RAM | ✅ | - | |
| REG | ❌ | ✅ | REG |
| Folder | ✅ | - | |
| Mesh | ❌ | ✅ | - |
| Script | ✅ | - |
Instance hard disk#
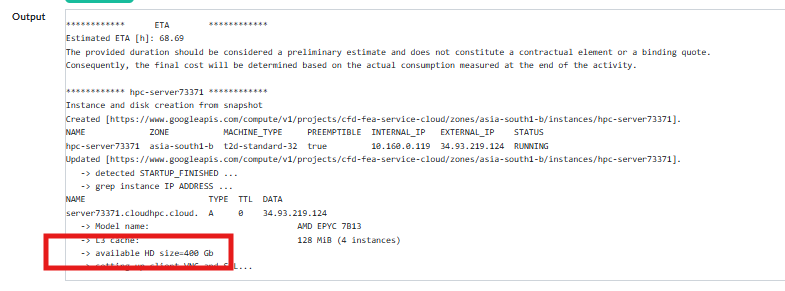
Every simulation is given a dedicated hard disk to run the calculation. In most cases its size is 400 GB, with a few exceptions:
- 4 vCPU machines (any RAM type) get a 200 GB hard disk
- highmem/REG machines with at least 16 vCPU get a 2000 GB hard disk
- highmem/SPOT machines with at least 16 vCPU get a 600 GB hard disk
You can check the actual hard disk size in the output window, as highlighted below.
Note
For specific needs, contact our support team, who will help you with the disk size and any expansion.
SPOT instance correct setup#
Since SPOT instances may be rebooted at any time during the simulation, you must set up your case correctly to avoid losing computing time. Each software package needs its own set-up, which is up to the user. Keep in mind that a reboot is only a probability, which mostly depends on:
- the number of SPOT simulations launched: about 30% of simulations are affected by at least one reboot
- the total time spent on SPOT machines: a reboot usually occurs every 10 or more hours of use
- the solver and the number of vCPU of each SPOT machine, which can change the above frequencies and probabilities
These figures are indicative, and different users may experience different behaviours. More information on this topic is available in this webinar:

By default, SPOT instances are not enabled on new accounts, to prevent their misuse. To enable SPOT instances on your account, fill in this form.
FDS#
To save restart files at regular intervals, FDS requires the DT_RESTART parameter of the DUMP namelist:
&DUMP DT_RESTART=300.0/
This tells the solver to save a restart file every 300.0 s of simulated time. If a SPOT instance reboots, the system automatically looks for the restart files written by FDS and, if found, restarts the simulation from them. The FDS template already contains this setting.
Note
Our team is in contact with NIST, the FDS developer. We strongly recommend using the most recent FDS version installed, to make sure your simulation does not run into issues or bugs that may affect its results.
Aim for a DT_RESTART that saves a restart file every 2 to 5 hours of run time. With this frequency, writing the restart files is unlikely to slow down your simulation and, if a reboot occurs, the simulated time lost is kept to a minimum.
OpenFOAM#
For OpenFOAM simulations, the restart options are set in the system/controlDict file. The following entries give you full control:
startFrom       latestTime; //on restart, start from the last saved time
writeControl    timeStep;   //how the write frequency is measured
writeInterval   100;        //how often results are written
purgeWrite      5;      //keep only the 5 most recent saved times and delete older ones
On SPOT instances you must set startFrom latestTime, so that after a reboot the simulation restarts from the last saved time. The writeInterval option then sets how often results, and therefore restart points, are saved. See the controlDict template.
Other software and custom-script#
Other software and custom scripts are not tested with SPOT instances: a reboot means losing all the time computed up to that moment. For this reason, SPOT instances are not enabled for all users by default. If you use a custom script, you can save checkpoints yourself, as done in the python-script template.
OpenFOAM specific settings#
Custom controlDict entries#
cloudHPC reads a few extra entries from system/controlDict to switch on optional steps of the run. OpenFOAM ignores them, so they can stay in the file when you run the case elsewhere. They are listed, commented out, in the controlDict template: uncomment the ones you need. Boolean switches must be written exactly as true (yes/on are not recognised).
Mesh stage: these entries only apply when the mesh is generated during the run (no constant/polyMesh uploaded, or a meshing script selected). They are applied after snappyHexMesh/cfMesh/blockMesh, in the order of the table:
| Entry | Values | Effect | Extra files required |
|---|---|---|---|
splitMesh |
true |
splits the mesh into one region per cellZone (every cell must belong to a cellZone), e.g. for CHT cases | — |
largest |
keeps only the largest connected region, removing mesh generated on the wrong side of the STL surfaces | — | |
nExtrusion |
N |
performs N mesh extrusions from boundary patches, in sequence | system/extrudeMeshDict.0 … system/extrudeMeshDict.<N-1> |
scaleFactor |
number | scales the final mesh uniformly, e.g. 0.001 for a geometry drawn in mm |
— |
Solver stage:
| Entry | Values | Effect |
|---|---|---|
potentialFoam |
true |
runs potentialFoam before the solver to initialise the U and p fields |
Custom OpenFOAM code#
You can run your own OpenFOAM solvers and libraries (e.g. boundary conditions): upload the source code inside the case folder, next to 0, constant and system. Before the run, cloudHPC compiles it on the instance with the OpenFOAM version selected in the Script field. The OpenFOAM-custom template is a complete, working case (tested on v2412) with a custom solver and a custom boundary condition library.
The compilation works as follows:
- The environment of the selected OpenFOAM version is loaded.
- If an
Allwmakescript is present in the case root, it is run first. Use it when the build order matters, e.g. a solver linking a library of the same case. - Every subfolder of the case root is then visited: its own
Allwmakeis run if present, otherwisewmakeis run on it. The output is saved to<folder>_compilation.log(Allwmake.logfor the root script). - The solver set in the
applicationentry ofcontrolDictis run as usual.
Keep in mind:
- Each source folder must sit directly in the case root and contain the standard
Make/filesandMake/options. Target$(FOAM_USER_APPBIN)for applications and$(FOAM_USER_LIBBIN)for libraries. - Select the custom solver with
application <solverName>;and load custom libraries withlibs ("lib<name>.so");insystem/controlDict. - Do not upload binaries compiled on your workstation (
.sofiles, executables,Make/linux64*,lnInclude): the code is always compiled from scratch on the cloud. - Code written for openfoam.com usually does not compile on openfoam.org, and vice versa.
- If the run stops right after starting, check the
*_compilation.logfiles for compiler errors.
More details in the blog post How to compile and execute custom OpenFOAM code on cloudHPC.
Run a custom-script#
Besides the available software, you can also run your own bash or python scripts. To do so, select the custom-script command in the Script drop-down menu, as shown in the following image:

This command automatically runs every bash (.sh) and python (.py) script found in the selected folder, in this order:
- every bash (
.sh) script is made executable and run, and its output is saved to a.logfile; - every python (
.py) script is run withpython3inside a virtual environment (py-cloudhpc), after installing the packages listed inrequirements.txt; its output is saved to a.logfile.
Upload the scripts you want to run to a folder in your storage, together with all the files they need. Keep in that folder only the scripts to be run: helper modules imported by your script should go in a subfolder. Any CSV file written during the run is plotted at runtime on the simulation page.
Templates and examples:
- custom-script template: bash script skeleton
- python-script template: parallel Python job with dependencies, runtime monitor and checkpoint/restart
- python3.12 example: the minimal custom-script job
- gpuBenchmark-cuda123 example: GPU job on a basegpu instance
To learn more about this feature, contact our support team via chat.
Run a static instance#
Besides scripts, you can also run static instances. These instances do not run any particular software: they are simply hardware resources made available to you through a remote desktop or SSH connection.
These instances are designed to help you:
- debug the set-up of a case before launching the solver;
- run the user interfaces installed on cloudHPC via the remote desktop;
- post-process the results once the simulation has completed.
Since these instances are static, no script is run on them.
Note
It is up to you to monitor static instances and stop them once your work is done.
You can stop them with the usual SOFT/HARD stop functions. A static instance is launched exactly like any other software: just pick one of the scripts with the "-static" suffix in the list.

Specific UI installed#
To access one of the software packages with a UI (user interface) installed on cloudHPC via remote desktop, follow the general procedure shown in the video below.
The following table lists the most common UIs available on the platform and the static instance to run to access them. For some of them, the table also gives the terminal command that starts the UI.
| SOFTWARE | STATIC INSTANCE | HOW TO START |
|---|---|---|
| cfMesh+ | cfMesh+-GUI-static | 🖥️ desktop icon |
| ParaView | any static | 🖥️ desktop icon |
| ElmerFEM v9 | ubuntu-2004-static | 🖥️ desktop icon |
| SALOME 9.8.0 | ubuntu-2004-static | 🖥️ desktop icon |
| SALOME MECA 2022 | ubuntu-2004-static | 🖥️ desktop icon |
| GMSH 4.11.1 | ubuntu-2004-static | 🖥️ desktop icon |
| HELYX-OS v2.4.0 | ubuntu-2004-static | 📟 terminal: /opt/Engys/HELYX-OS/v2.4.0/HELYX-OS.sh |
| SU2 8.2.0 | ubuntu-2404-static | 🖥️ desktop icon |
| baramFlow v25 | ubuntu-2404-static | 🖥️ desktop icon |
| baramMesh v25 | ubuntu-2404-static | 🖥️ desktop icon |
| FDS SMV | any static | 📟 terminal: /opt/FDS/{VERSION}/smvbin/smokeview |
More info and details#
For more details, watch the following YouTube video about the official release of the remote desktop, which shows how to use a static instance.
To learn more about this feature, contact our support team via chat.
Soft and Hard stop#
You can stop a simulation from the SIMULATIONS list, as shown below.

There are two ways to stop a simulation:
Soft Stop#
The soft stop interrupts the simulation and saves the results computed up to that moment. Use it when you already have the results you need, or when you want to stop the simulation and continue it later.
Hard Stop#
The hard stop kills the simulation without saving any results.

Danger
After a hard stop, the system deletes the results computed by your simulation, with no possibility of restoring them.
Restart#
To restart a simulation that has completed or has been stopped with a soft stop, open the 'Simulations' page of the cloudHPC portal and add a new simulation whose vCPU, RAM, folder and script exactly match those of the analysis you want to restart. Each software package also needs some specific changes, described below.
Fire Dynamics Simulator#
FDS simulations restart automatically if T_END has not been reached yet: if needed, edit the .fds file and increase this parameter. The platform detects the .restart files written by the previous run and, if found, restarts the simulation from them. Make sure you set how often FDS writes restart files with the appropriate parameter in your .fds file:
&DUMP DT_RESTART=300.0 /
OpenFOAM#
The file to modify is controlDict, in the system folder, which holds the restart settings. Edit it so that it contains the following entries:
startFrom      latestTime;
endTime        XXX;
where endTime must be greater than the time the simulation restarts from. With this setting, the simulation restarts from the last saved time folder. If you always keep startFrom latestTime; in your controlDict, the same file starts from 0 on the first run and restarts from the latest saved time afterwards.
code_aster#
The file to modify locally and replace in the web app STORAGE folder is the .comm file. To restart the analysis, replace DEBUT() with:
POURSUITE()
The database of the previous run must be saved and read back: the code_aster template saves it to the base-stage1/ folder. You can find a detailed procedure in this blog post.